
Table of Contents
Overview and Introduction to Website or Blog Indexing

In the digital world, having your website or blog appear in search engine results is crucial for visibility and traffic. This process is known as indexing. When search engines like Google, Bing, and Yandex index your site, they include your content in their search results.
What is Blog or Website Indexing?
Blog or website indexing is the process by which search engines collect, parse, and store data to make it searchable. When your site is indexed, it means search engines have crawled your pages and added them to their database, making them available in search results.
How to Index a Website on Google?

To index your website on Google, you’ll need to use Google Search Console. Here’s a step-by-step guide:
- Sign in to Google Search Console: If you don’t have an account, create one using your Google account.
- Add Property: Click “Add Property” and enter your website URL.
- Verify Ownership: Choose a verification method and follow the instructions to verify your site.
- Submit Sitemap: Once verified, go to the Sitemaps section and submit your sitemap URL.
How to Index a Blog?
Indexing a blog follows a similar process. Whether you’re using Blogger, WordPress, or another platform, you’ll need to submit your blog’s URL to search engines through their webmaster tools.
How to Index a Blogger Site on Google Search Console and Bing Webmaster
Google Search Console:

- Add Property: Log in to Google Search Console and add your Blogger site’s URL.
- Verify Ownership: Follow the instructions to verify your site.
-
Submit Sitemap: Submit your Blogger sitemap by adding
atom.xmlto your URL (e.g., http://yourblog.blogspot.com/atom.xml).
Bing Webmaster:
- Sign in to Bing Webmaster Tools: Use your Microsoft account to log in.
- Add Site: Enter your Blogger site URL and click “Add.”
- Verify Ownership: Follow the verification steps.
- Submit Sitemap: Submit your Blogger sitemap (e.g., http://yourblog.blogspot.com/atom.xml).
How to Index a WordPress Site on Google Search Console, Bing Webmaster, and Yandex Webmaster
Google Search Console:
- Install Yoast SEO: Install the Yoast SEO plugin for WordPress.
- Add Property: Log in to Google Search Console and add your WordPress site’s URL.
- Verify Ownership: Use the HTML tag provided by Yoast SEO for verification.
-
Submit Sitemap: Submit your sitemap URL, usually found at
yourwebsite.com/sitemap_index.xml.
Bing Webmaster:
- Install Rank Math SEO: Install the Rank Math SEO plugin for WordPress.
- Add Site: Log in to Bing Webmaster Tools and add your site URL.
- Verify Ownership: Follow the instructions for verification.
- Submit Sitemap: Submit your sitemap URL.
Yandex Webmaster:

- Sign in to Yandex Webmaster: Use your Yandex account to log in.
- Add Site: Enter your WordPress site URL and click “Add.”
- Verify Ownership: Follow the provided instructions for verification.
- Submit Sitemap: Submit your sitemap URL.
How to Verify Ownership of Domain Using DNS Record, HTML Meta Tag, and XML File in Bing Webmaster, Google Search Console, and Yandex Webmaster (Detailed Step-by-Step Guide)
Google Search Console:
- DNS Record Verification:
- Log in to your domain registrar (e.g., GoDaddy, Namecheap).
- Go to the DNS management section and add a new TXT record with the value provided by Google Search Console.
- Save the changes and click “Verify” in Google Search Console.
- HTML Meta Tag Verification:
- Copy the meta tag provided by Google Search Console.
- Paste the meta tag in the
<head>section of your website’s HTML code. - Save the changes and click “Verify” in Google Search Console.
- XML File Verification:
- Download the verification file provided by Google Search Console.
- Upload the file to the root directory of your website.
- Click “Verify” in Google Search Console.
Bing Webmaster:
- DNS Record Verification:
- Log in to your domain registrar (e.g., GoDaddy, Namecheap).
- Go to the DNS management section and add a new TXT record with the value provided by Bing Webmaster.
- Save the changes and click “Verify” in Bing Webmaster.
- HTML Meta Tag Verification:
- Copy the meta tag provided by Bing Webmaster.
- Paste the meta tag in the
<head>section of your website’s HTML code. - Save the changes and click “Verify” in Bing Webmaster.
- XML File Verification:
- Download the verification file provided by Bing Webmaster.
- Upload the file to the root directory of your website.
- Click “Verify” in Bing Webmaster.
Yandex Webmaster:
- DNS Record Verification:
- Log in to your domain registrar (e.g., GoDaddy, Namecheap).
- Go to the DNS management section and add a new TXT record with the value provided by Yandex Webmaster.
- Save the changes and click “Verify” in Yandex Webmaster.
- HTML Meta Tag Verification:
- Copy the meta tag provided by Yandex Webmaster.
- Paste the meta tag in the
<head>section of your website’s HTML code. - Save the changes and click “Verify” in Yandex Webmaster.
- XML File Verification:
- Download the verification file provided by Yandex Webmaster.
- Upload the file to the root directory of your website.
- Click “Verify” in Yandex Webmaster.
How to Index Pages in WordPress? (Step-by-Step Guide)
Let’s Index web pages in WordPress using Yoast SEO and Rank Math Plugin with Step by Step Guide. Follow the steps below:
Step 1: Install and Activate Rank Math Plugin
- Log in to your WordPress admin dashboard.
- Navigate to Plugins > Add New.
- Search for Rank Math SEO in the search bar.
- Click on Install Now and then Activate once the installation is complete.
Step 2: Set Up Rank Math Plugin
- After activation, you’ll be guided through the Rank Math setup wizard.
- Follow the on-screen instructions to configure the basic settings, such as your website type, preferred settings, and importing data from other SEO plugins if applicable.
Step 3: Connect Rank Math to Google Search Console
- In the WordPress dashboard, go to Rank Math > General Settings.
- Click on Search Console.
- Click on Get Authorization Code and sign in to your Google account.
- Copy the authorization code provided by Google and paste it into the Rank Math settings.
- Click on Save Changes to connect Rank Math with Google Search Console.
Step 4: Generate and Submit Sitemap
- Navigate to Rank Math > Sitemap Settings.
- Ensure that the Sitemaps option is enabled.
- Configure the sitemap settings according to your preferences, such as including or excluding certain types of content (e.g., posts, pages, categories).
- Save the changes to generate the sitemap.
- You can find the sitemap URL by clicking on the Sitemap link at the top of the Sitemap Settings page (e.g.,
yourwebsite.com/sitemap_index.xml).
Step 5: Submit Sitemap to Google Search Console
- Go to Google Search Console and log in with your Google account.
- Select your website property.
- Navigate to Sitemaps in the left-hand menu.
- Enter the sitemap URL generated by Rank Math and click on Submit.
Step 6: Request Indexing for Individual Pages
- In the WordPress dashboard, go to the page or post you want to index.
- Scroll down to the Rank Math SEO settings below the content editor.
- Ensure that the Index option is enabled under the Advanced tab.
- Update or publish the page.
Step 7: Verify Indexing Status
- In Google Search Console, go to the URL Inspection Tool.
- Enter the URL of the page you want to check.
- Click on Request Indexing if the page is not yet indexed.
- Google will crawl and index the page, and you can verify the status in the Search Console.
Using Yoast SEO Plugin: —
- Install Yoast SEO: Install and activate the Yoast SEO plugin.
- Configure Plugin: Go to SEO settings and configure the plugin.
- Submit Sitemap: Go to SEO > General > Features > XML Sitemaps and submit the URL.
The rest of the steps are same as Rank Math Plugin Steps.
How to Index a WordPress Website on Google? (Step-by-Step Guide)
- Log in to Google Search Console: Add your WordPress site and verify ownership.
- Submit Sitemap: Submit your sitemap URL using the Yoast SEO plugin.
How to Index a Blogger Post in Google? (Step-by-Step Guide)
- Log in to Google Search Console: Add your Blogger site.
- Verify Ownership: Follow the instructions to verify your site.
-
Submit Sitemap: Use the
atom.xmlformat for your sitemap URL.
What is Yandex Webmaster?
Yandex Webmaster is a tool provided by Yandex to help webmasters manage their site’s presence in Yandex search results. It offers insights into how Yandex indexes your site and helps you improve its visibility.
How to Index a Website in Yandex Webmaster?
- Sign in to Yandex Webmaster: Use your Yandex account to log in.
- Add Site: Enter your site URL and click “Add.”
- Verify Ownership: Follow the instructions for verification.
- Submit Sitemap: Submit your sitemap URL.
What is Instant Indexing?
Instant Indexing is a feature that allows webmasters to quickly index their pages in search engines. This is particularly useful for time-sensitive content.
How to Do Instant Indexing for WordPress and Google Blogger?
For WordPress, you can use the Instant Indexing plugin by Rank Math. For Blogger, you can use the Instant Indexing API provided by Google.
How Do You Filter Indexing of Posts, Pages, Categories, and Tags on Google Search Console, Bing Webmaster, and Yandex Webmaster?
Filtering indexing allows you to include or exclude specific types of content like posts, pages, categories, and tags.
Google Search Console:
- Log in to Google Search Console.
- Go to the URL Inspection Tool: Enter the URL of the page you want to inspect.
- Indexing Options: You can choose to request indexing, remove URLs, or update sitemap preferences.
Bing Webmaster:
- Log in to Bing Webmaster Tools.
- Go to the Configure My Site section: Select Crawl Control or Submit URLs.
- Set Preferences: Adjust the indexing preferences for posts, pages, categories, and tags.
Yandex Webmaster:
- Log in to Yandex Webmaster.
- Go to Indexing Settings: Select URL parameters or exclusions.
- Set Preferences: Adjust the indexing preferences for different types of content.
What is Robots.txt?
Robots.txt is a file that instructs search engine crawlers which pages to index and which to avoid. It helps manage and control the indexing process, ensuring that search engines crawl the relevant parts of your site.
Robots.txt in Google Blogger and WordPress:
For Blogger, you can configure robots.txt in the settings. For WordPress, you can use the Yoast SEO or Rank Math plugins.
Example of Robots.txt Configuration:
Copied!User-agent: * Disallow: /admin/ Disallow: /login/ Allow: /public/ Crawl-delay: 10 Sitemap: http://yourwebsite.com/sitemap.xml
Explanation:
-
User-agent: *applies to all crawlers. -
Disallow: /admin/blocks crawlers from accessing the/admin/directory. -
Disallow: /login/blocks crawlers from accessing the/login/page. -
Allow: /public/permits crawlers to access the/public/directory. -
Crawl-delay: 10instructs crawlers to wait 10 seconds between requests. -
Sitemap:specifies the location of your sitemap.
Why Do You Need to Index a Website or a Blog and What Are the Advantages of Indexing a Website?
Indexing your website or blog ensures that your content appears in search engine results, driving organic traffic and improving your site’s visibility. It helps you reach a broader audience and enhances your site’s credibility.
Common Indexing Mistakes to Avoid
When it comes to indexing your website or blog, there are some common mistakes that can hinder your efforts. Being aware of these can help ensure your content is properly indexed and easily found by search engines.
1. Not Verifying Ownership
Failing to verify ownership of your site in Google Search Console, Bing Webmaster, and Yandex Webmaster can prevent search engines from indexing your content. Make sure to complete this step for each platform.
2. Not Submitting a Sitemap
A sitemap helps search engines understand the structure of your site and index your pages more efficiently. Not submitting a sitemap can lead to incomplete or delayed indexing.
3. Blocking Search Engines with Robots.txt
Improperly configuring your robots.txt file can block search engines from crawling your site. Ensure that you’re not unintentionally preventing search engines from accessing your content.
4. Duplicate Content
Having duplicate content on your site can confuse search engines and result in lower rankings. Use canonical tags to indicate the preferred version of a page to avoid duplicate content issues.
5. Missing Meta Tags
Meta tags like title tags and meta descriptions provide important information to search engines about your content. Ensure these are present and optimized for each page.
6. Ignoring Mobile Optimization
With the increasing use of mobile devices, search engines prioritize mobile-friendly sites. Failing to optimize your site for mobile can negatively impact your indexing and ranking.
7. Slow Page Load Times
Slow-loading pages can result in a poor user experience and negatively affect your indexing. Optimize your site’s performance to improve load times and indexing.
8. Not Using HTTPS
Search engines favor secure websites. If your site isn’t using HTTPS, it could impact your indexing and ranking. Ensure your site is secure by using an SSL certificate.
9. Broken Links
Broken links can disrupt the crawling and indexing process. Regularly check for and fix broken links on your site to ensure smooth indexing.
10. Ignoring Search Console Errors
Google Search Console provides valuable insights and error reports. Ignoring these reports can lead to indexing issues. Regularly monitor and address any errors flagged by the console.
How to Fix Common Indexing Mistakes
1. Not Verifying Ownership
Fix: Make sure to verify ownership of your site in Google Search Console, Bing Webmaster, and Yandex Webmaster. Each platform provides several verification methods, such as adding an HTML tag to your site’s code, uploading an HTML file, or verifying through your domain name provider. Follow the step-by-step instructions provided by each tool to complete the verification process.
2. Not Submitting a Sitemap
Fix: Generate a sitemap for your site and submit it to Google Search Console, Bing Webmaster, and Yandex Webmaster. For WordPress sites, you can use plugins like Yoast SEO or Rank Math to create a sitemap. Once created, go to the Sitemaps section in each webmaster tool and submit the URL of your sitemap (e.g., yourwebsite.com/sitemap.xml).
3. Blocking Search Engines with Robots.txt
Fix: Review your robots.txt file to ensure you’re not blocking search engines from crawling important pages. Your robots.txt file should be located at the root of your site (e.g., yourwebsite.com/robots.txt). Ensure that key pages are not disallowed. You can test your robots.txt file using the tools provided by Google Search Console and Bing Webmaster.
4. Duplicate Content
Fix: Use canonical tags to specify the preferred version of a page. This helps search engines understand which version to index and avoid duplicate content issues. For WordPress users, the Yoast SEO plugin automatically adds canonical tags to your pages. You can also manually add canonical tags in the HTML code of your pages.
5. Missing Meta Tags
Fix: Ensure that each page on your site has a unique title tag and meta description. These tags provide search engines with essential information about your content, improving your chances of being indexed and ranked. Use SEO plugins like Yoast SEO or Rank Math for WordPress to easily add and manage meta tags. Make sure your title tags are concise and descriptive, and your meta descriptions are compelling and informative.
6. Ignoring Mobile Optimization
Fix: Use responsive design to ensure your site is mobile-friendly. Check your site’s mobile compatibility using Google’s Mobile-Friendly Test tool. Optimize images, improve page load times, and ensure that your site’s layout adapts to different screen sizes. Mobile-friendly sites are prioritized by search engines.
7. Slow Page Load Times
Fix: Optimize your site’s performance by compressing images, leveraging browser caching, and minimizing HTTP requests. Use tools like Google PageSpeed Insights to identify areas for improvement. Make sure your site loads quickly to provide a better user experience and improve indexing.
8. Not Using HTTPS
Fix: Secure your site with an SSL certificate to enable HTTPS. Most web hosting providers offer SSL certificates, and some even provide them for free. Once you have an SSL certificate, update your site’s URL to use HTTPS and redirect HTTP traffic to HTTPS. Search engines favor secure sites in their rankings.
9. Broken Links
Fix: Regularly check for and fix broken links on your site. Use tools like Google Search Console, Screaming Frog SEO Spider, or Broken Link Checker to identify broken links. Update or remove broken links to ensure a smooth user experience and proper indexing.
10. Ignoring Search Console Errors
Fix: Regularly monitor Google Search Console and address any errors or issues flagged by the tool. Google Search Console provides insights into crawl errors, indexing issues, and other important factors affecting your site’s performance. Act promptly to resolve these issues and maintain optimal indexing.
Importance of Indexing for SEO
Indexing is a fundamental aspect of Search Engine Optimization (SEO) and plays a critical role in ensuring that your website or blog is visible to search engines and, consequently, to users. Here’s why indexing is so important for SEO:
1. Visibility in Search Results
Indexing is the process by which search engines like Google, Bing, and Yandex include your website’s content in their databases. If your site isn’t indexed, it won’t appear in search engine results, meaning potential visitors won’t find your content.
2. Increased Organic Traffic
Once your site is indexed, it can appear in search engine results for relevant queries. Proper indexing increases the likelihood of attracting organic traffic—visitors who find your site through search engines rather than paid advertisements.
3. Improved User Experience
Indexing helps search engines understand the structure and content of your site. This enables them to deliver more accurate and relevant results to users, improving their overall experience. A well-indexed site makes it easier for users to find the information they need quickly.
4. Content Discovery
Indexing ensures that all your site’s pages, including new and updated content, are discoverable by search engines. This is especially important for dynamic websites and blogs that frequently publish new content. It helps keep your site up-to-date in search results.
5. SEO Performance Monitoring
Search engines like Google and Bing provide webmaster tools that allow you to monitor your site’s indexing status, performance, and potential issues. By regularly checking these tools, you can identify and fix problems that may affect your SEO performance.
6. Competitive Advantage
Proper indexing can give you a competitive edge. When your site is indexed efficiently, it can rank higher in search results compared to competitors who might not be optimizing their indexing practices. This can lead to more visibility, traffic, and conversions.
7. Relevance and Authority
Indexed content is evaluated by search engines for relevance and authority. By ensuring your site is properly indexed and optimized, you improve its chances of ranking higher for relevant keywords, establishing your site as an authoritative source in your niche.
8. Facilitates SEO Strategies
Indexing is the foundation upon which many SEO strategies are built. Without proper indexing, efforts like keyword optimization, content marketing, and link-building may not achieve their full potential. Ensuring your site is indexed allows these strategies to be more effective.
Best Practices for Effective Indexing
1. Submit a Sitemap
A sitemap is a file that lists all the pages on your site, helping search engines understand its structure. Regularly update and submit your sitemap to Google Search Console, Bing Webmaster, and Yandex Webmaster to ensure all your pages are indexed.
2. Use Clean and Simple URL Structures
Ensure your URLs are clean, simple, and descriptive. Avoid using complex or lengthy URLs with unnecessary parameters. Simple URLs are easier for search engines to crawl and understand.
3. Optimize Meta Tags
Use unique and descriptive meta titles and descriptions for each page. These tags provide search engines with essential information about your content, improving your chances of being indexed and ranked.
4. Create High-Quality Content
Publish high-quality, original content that is valuable to your audience. Search engines prioritize content that is informative, engaging, and relevant. Regularly update your site with fresh content to encourage frequent indexing.
5. Ensure Mobile-Friendliness
Optimize your site for mobile devices. Use responsive design to ensure your site looks and functions well on all screen sizes. Mobile-friendly sites are prioritized by search engines.
6. Improve Site Speed
Ensure your site loads quickly by optimizing images, using a content delivery network (CDN), and minimizing HTTP requests. Fast-loading sites provide a better user experience and are favored by search engines.
7. Use Internal Linking
Create a strong internal linking structure to help search engines discover and crawl your pages. Link related content within your site to provide additional context and improve navigation.
8. Fix Crawl Errors
Regularly check for and fix crawl errors reported by Google Search Console and other webmaster tools. Addressing these errors ensures search engines can access and index your content without issues.
9. Optimize Robots.txt File
Configure your robots.txt file to control which pages search engines can crawl. Ensure important pages are not blocked, and use the Crawl-Delay directive to manage crawl rates.
10. Implement Structured Data
Use structured data (schema markup) to provide search engines with additional information about your content. Structured data helps search engines understand your site better and can improve your appearance in search results.
11. Build Quality Backlinks
Earn quality backlinks from reputable websites to improve your site’s authority and indexing. Backlinks signal to search engines that your content is valuable and trustworthy.
12. Monitor Indexing Status
Regularly monitor your site’s indexing status using Google Search Console, Bing Webmaster, and Yandex Webmaster. Keep an eye on indexed pages, crawl errors, and other issues that may affect your site’s visibility.
13. Use HTTPS
Ensure your site uses HTTPS instead of HTTP. Search engines prefer secure sites, and using HTTPS can positively impact your indexing and ranking.
14. Submit URL for Indexing
If you have new or updated content, use the URL inspection tool in Google Search Console and other webmaster tools to submit the URL for indexing. This can speed up the indexing process.
Advanced Techniques for Indexing
For those looking to take their indexing to the next level, here are some advanced techniques that can improve performance and efficiency:
1. Composite Indexes
A composite index, also known as a multi-column index, includes more than one column. It can significantly enhance query performance when queries frequently filter or sort based on multiple columns.
Example:
Copied!CREATE INDEX idx_customer_name_city ON customers(last_name, first_name, city);
This index is useful for queries that filter or sort based on these three columns in order:
Copied!SELECT * FROM customers WHERE last_name = 'Smith' AND first_name = 'John' ORDER BY city;
2. Covering Indexes
A covering index includes all the columns required by a query, allowing the database to satisfy the query using only the index. This eliminates the need to access the actual table (a table scan), significantly speeding up query execution.
Example:
Copied!CREATE INDEX idx_order_details ON orders(order_id, customer_id, order_date);
This index covers the following query:
Copied!SELECT order_id, customer_id, order_date FROM orders WHERE customer_id = 12345;
The database can retrieve all the required columns directly from the index, avoiding a table scan.
3. Partial Indexing
Partial indexing involves creating indexes on a subset of data, rather than the entire table. This can be useful when you only need to index specific rows that meet certain criteria, reducing the size of the index and improving performance.
Example:
Copied!CREATE INDEX idx_active_customers ON customers(customer_id) WHERE status = 'active';
This index only includes rows where the status column is ‘active’, making it more efficient for queries that filter by this condition:
Copied!SELECT * FROM customers WHERE status = 'active';
4. Index Intersection
Index intersection is a technique where multiple indexes are used together to satisfy a query. This can be beneficial when a single index does not cover all the columns needed for a query. By combining multiple indexes, the database can efficiently retrieve the required data.
Example:
Consider two indexes:
Copied!CREATE INDEX idx_last_name ON customers(last_name); CREATE INDEX idx_city ON customers(city);
A query that filters by both last_name and city can use index intersection:
Copied!SELECT * FROM customers WHERE last_name = 'Smith' AND city = 'New York';
The database can combine the results from both indexes to satisfy the query.
5. Expression Indexes
Expression indexes are created based on expressions or functions applied to columns. This can be useful for indexing computed values or derived data, allowing for more efficient query performance.
Example:
Copied!CREATE INDEX idx_lower_email ON users(LOWER(email));
This index can be used for queries that perform case-insensitive searches on the email column:
Copied!SELECT * FROM users WHERE LOWER(email) = 'example@example.com';
Configuration of Robots.txt with Crawl Delay Examples and Allow/Disallow of Website Crawlers – Full Guide
The robots.txt file is used to control the behavior of search engine crawlers on your site. Here’s how to configure it:
Basic Structure:
Copied!User-agent: [crawler_name] Disallow: [path_to_block] Allow: [path_to_allow] Crawl-Delay: [seconds]
Example:
Here’s a detailed example of a robots.txt file that includes instructions for different search engine crawlers:
Copied!User-agent: * Disallow: /private/ Allow: /public/ Crawl-Delay: 10 User-agent: Googlebot Disallow: /no-google/ Allow: /yes-google/ Crawl-Delay: 5 User-agent: Bingbot Disallow: /no-bing/ Allow: /yes-bing/ Crawl-Delay: 10 User-agent: Yandex Disallow: /no-yandex/ Allow: /yes-yandex/ Crawl-Delay: 15
In this example:
- The
*wildcard applies to all crawlers, disallowing access to the/private/directory, allowing access to the/public/directory, and setting a crawl delay of 10 seconds. - Specific rules are set for Googlebot, Bingbot, and Yandex, disallowing and allowing access to certain directories and setting custom crawl delays for each crawler.
How to Verify Ownership of Domain Using DNS Record, HTML Meta Tag, and XML File in Bing Webmaster, Google Search Console, and Yandex Webmaster (Detailed Step-by-Step Guide)
Google Search Console:
- DNS Record Verification:
- Log in to your domain registrar (e.g., GoDaddy, Namecheap, Hostinger).
- Go to the DNS management section and add a new TXT record with the value provided by Google Search Console.
- Save the changes and click “Verify” in Google Search Console.
- HTML Meta Tag Verification:
- Copy the meta tag provided by Google Search Console.
- Paste the meta tag in the
<head>section of your website’s HTML code. - Save the changes and click “Verify” in Google Search Console.
- XML File Verification:
- Download the verification file provided by Google Search Console.
- Upload the file to the root directory of your website.
- Click “Verify” in Google Search Console.
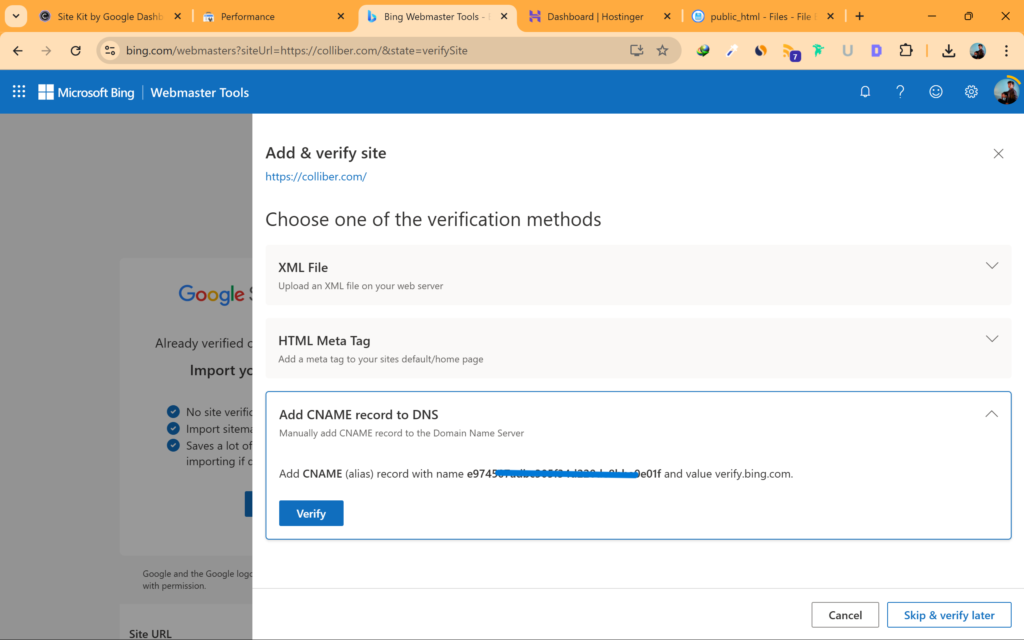
Bing Webmaster:
- DNS Record Verification:
- Log in to your domain registrar (e.g., GoDaddy, Namecheap, Hostinger).
- Go to the DNS management section and add a new TXT record with the value provided by Bing Webmaster.
- Save the changes and click “Verify” in Bing Webmaster.
- HTML Meta Tag Verification:
- Copy the meta tag provided by Bing Webmaster.
- Paste the meta tag in the
<head>section of your website’s HTML code. - Save the changes and click “Verify” in Bing Webmaster.
- XML File Verification:
- Download the verification file provided by Bing Webmaster.
- Upload the file to the root directory of your website.
- Click “Verify” in Bing Webmaster.
Yandex Webmaster:
- DNS Record Verification:
- Log in to your domain registrar (e.g., GoDaddy, Namecheap, Hostinger).
- Go to the DNS management section and add a new TXT record with the value provided by Yandex Webmaster.
- Save the changes and click “Verify” in Yandex Webmaster.
- HTML Meta Tag Verification:
- Copy the meta tag provided by Yandex Webmaster.
- Paste the meta tag in the
<head>section of your website’s HTML code. - Save the changes and click “Verify” in Yandex Webmaster.
- XML File Verification:
- Download the verification file provided by Yandex Webmaster.
- Upload the file to the root directory of your website.
- Click “Verify” in Yandex Webmaster.
How to Index Pages in WordPress? (Step-by-Step Guide)
- Install Yoast SEO: Install and activate the Yoast SEO plugin.
- Configure Plugin: Go to SEO settings and configure the plugin.
- Submit Sitemap: Go to SEO > General > Features > XML Sitemaps and submit the URL.
How to Index a WordPress Website on Google? (Step-by-Step Guide)
- Log in to Google Search Console: Add your WordPress site and verify ownership.
- Submit Sitemap: Submit your sitemap URL using the Yoast SEO plugin.
How to Index a Blogger Post in Google? (Step-by-Step Guide)
- Log in to Google Search Console: Add your Blogger site.
- Verify Ownership: Follow the instructions to verify your site.
-
Submit Sitemap: Use the
atom.xmlformat for your sitemap URL.
What is Yandex Webmaster?
Yandex Webmaster is a tool provided by Yandex to help webmasters manage their site’s presence in Yandex search results. It offers insights into how Yandex indexes your site and helps you improve its visibility.
How to Index a Website in Yandex Webmaster?
- Sign in to Yandex Webmaster: Use your Yandex account to log in.
- Add Site: Enter your site URL and click “Add.”
- Verify Ownership: Follow the instructions for verification.
- Submit Sitemap: Submit your sitemap URL.
What is Instant Indexing?
Instant Indexing is a feature that allows webmasters to quickly index their pages in search engines. This is particularly useful for time-sensitive content.
How to Do Instant Indexing for WordPress and Google Blogger?
For WordPress, you can use the Instant Indexing plugin by Rank Math. For Blogger, you can use the Instant Indexing API provided by Google.
Guide on How to setup Instant Indexing on Blogger Easily. Look more into this article by Google on how to setup and use instant indexing API.
How Do You Filter Indexing of Posts, Pages, Categories, and Tags on Google Search Console, Bing Webmaster, and Yandex Webmaster?
Filtering indexing allows you to include or exclude specific types of content like posts, pages, categories, and tags.
Google Search Console:
- Log in to Google Search Console.
- Go to the URL Inspection Tool: Enter the URL of the page you want to inspect.
- Indexing Options: You can choose to request indexing, remove URLs, or update sitemap preferences.
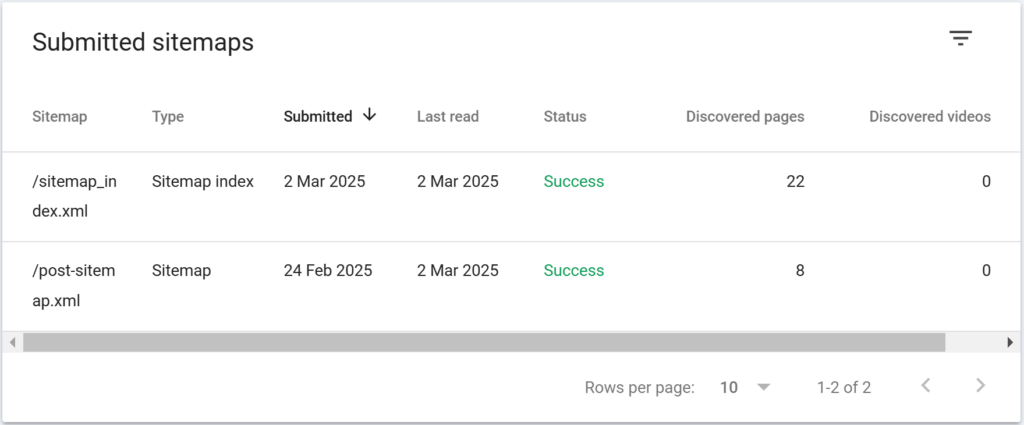
Examples:
Copied!https://colliber.com/post-sitemap.xml [Only indexes Articles (Posts)] https://colliber.com/how-to-index-a-website-or-blog-on-google-bing-and-yandex-webmaster/ [Only indexes this particular Post/Article] https://colliber.com/page-sitemap.xml [Only indexes Pages] https://colliber.com/category-sitemap.xml [Only indexes categories]
These are some of the examples on how to filter the indexing. If you want to index only Post and Pages You can do so by only submitting the Post and Page Sitemap to the Search Console. You can also further filter the indexing of Posts and Pages by manually entering each Post and Page URLs.
Filtering sitemap helps you index your website better and filtering out unnecessary URLs (e.g. https://colliber.com/how-to-index-a-website-or-blog-on-google-bing-and-yandex-webmaster/amp). This is amp version URL so it automatically excluded it because I have filtered the indexing of sitemap to only Post and Page instead of the whole sitemap.
Bing Webmaster:
- Log in to Bing Webmaster Tools.
- Go to the Configure My Site section: Select Crawl Control or Submit URLs.
- Set Preferences: Adjust the indexing preferences for posts, pages, categories, and tags.
Examples:
Copied!https://colliber.com/post-sitemap.xml [Only indexes Articles (Posts)] https://colliber.com/how-to-index-a-website-or-blog-on-google-bing-and-yandex-webmaster/ [Only indexes this particular Post/Article] https://colliber.com/page-sitemap.xml [Only indexes Pages] https://colliber.com/category-sitemap.xml [Only indexes categories]
These are some of the examples on how to filter the indexing. If you want to index only Post and Pages You can do so by only submitting the Post and Page Sitemap to the Bing Webmaster. You can also further filter the indexing of Posts and Pages by manually entering each Post and Page URLs.
Filtering sitemap helps you index your website better and filtering out unnecessary URLs (e.g. https://colliber.com/how-to-index-a-website-or-blog-on-google-bing-and-yandex-webmaster/amp). This is amp version URL so it automatically excluded it because I have filtered the indexing of sitemap to only Post and Page instead of the whole sitemap.
Yandex Webmaster:
- Log in to Yandex Webmaster.
- Go to Indexing Settings: Select URL parameters or exclusions.
- Set Preferences: Adjust the indexing preferences for different types of content.
Examples:
Copied!https://colliber.com/post-sitemap.xml [Only indexes Articles (Posts)] https://colliber.com/how-to-index-a-website-or-blog-on-google-bing-and-yandex-webmaster/ [Only indexes this particular Post/Article] https://colliber.com/page-sitemap.xml [Only indexes Pages] https://colliber.com/category-sitemap.xml [Only indexes categories]
These are some of the examples on how to filter the indexing. If you want to index only Post and Pages You can do so by only submitting the Post and Page Sitemap to the Yandex Webmaster. You can also further filter the indexing of Posts and Pages by manually entering each Post and Page URLs.
Filtering sitemap helps you index your website better and filtering out unnecessary URLs (e.g. https://colliber.com/how-to-index-a-website-or-blog-on-google-bing-and-yandex-webmaster/amp). This is amp version URL so it automatically excluded it because I have filtered the indexing of sitemap to only Post and Page instead of the whole sitemap.
Configuration of Robots.txt with Crawl Delay Examples and Allow/Disallow of Website Crawlers
The robots.txt file is used to control the behavior of search engine crawlers on your site. Here’s how to configure it:
Basic Structure:
Copied!User-agent: [crawler_name] Disallow: [path_to_block] Allow: [path_to_allow] Crawl-Delay: [seconds]
Example:
- Disallow All Crawlers from Accessing a Specific Directory:
Copied!User-agent: * Disallow: /private/
This example disallows all crawlers from accessing the /private/ directory.
- Allow All Crawlers to Access a Specific File:
Copied!User-agent: * Allow: /public/page.html
This example allows all crawlers to access the /public/page.html file even if the parent directory is disallowed.
- Set Crawl Delay for a Specific Crawler:
Copied!User-agent: Googlebot Crawl-Delay: 10
This example sets a 10-second crawl delay for Googlebot.
- Block a Specific Crawler from the Entire Site:
Copied!User-agent: Bingbot Disallow: /
This example disallows Bingbot from accessing the entire site.
- Allow and Disallow Specific Paths for a Specific Crawler:
Copied!User-agent: Yandex Disallow: /private/ Allow: /private/public-info.html
This example disallows Yandex from accessing the /private/ directory but allows access to the /private/public-info.html file.
- Crawl Delay with Allow and Disallow Directives:
Copied!User-agent: * Disallow: /private/ Allow: /private/index.html Crawl-Delay: 5
This example sets a 5-second crawl delay for all crawlers, disallows access to the /private/ directory, but allows access to the /private/index.html file.
Conclusion for configuring Robots.txt
By following these steps and using the robots.txt file effectively, you can control the behavior of search engine crawlers on your site, ensuring that important pages are indexed while sensitive or irrelevant pages are excluded.
Examples of Well-Indexed Sites
To give you a better understanding, here are some examples of well-indexed sites:
-
Moz Blog:
Moz Blog is well-indexed with a clear sitemap, optimized meta tags, and a robust internal linking structure. They frequently publish high-quality content that is quickly indexed by search engines. -
HubSpot Blog:
HubSpot Blog utilizes clean URL structures, comprehensive sitemaps, and structured data to ensure their content is easily discoverable by search engines. -
Search Engine Journal:
Search Engine Journal is another example of a well-indexed site. They use efficient indexing practices, including regular updates, mobile optimization, and high-quality backlinks.
By analyzing these sites, you can gain insights into effective indexing strategies and apply them to your own website or blog.
Conclusion for Indexing a Website/Blog or Posts/Pages in Google, Bing, and Yandex
Indexing your website or blog is essential for online visibility. By following the steps outlined in this guide, you can ensure that your content is indexed by Google, Bing, and Yandex, helping you reach a wider audience and drive more traffic to your site.
Related: How to do SEO to Boost Page Ranking on Search Engines like Google and Bing?


Leave a Reply to Best SEO Backlink Services Cancel reply